Tuesday, January 15, 2013

01/11-01/23 - Candy Bar Wrappers

Candy Bar Wrapper


Lesson Objective: SWBAT measure and draw a grid in order to enlarge a picture three times it's original size.

Essential Skill to be Mastered: To use math skills to measure and draw a grid. To enlarge and paint a picture 3 times it's original size.

I Can Statement: I can correctly measure a grid and enlarge a picture.

Teaching Strategy: Day 1 - I show students examples of the project and ask them how they think that other students were able to draw something that looked really close to the orignal picture but much larger. We discuss measuring and how we use it in our lives. I then have students pick a black and white copy of a candy bar wrapper of their choosing. I have them follow along with me when making the grid on the original picture. I then model how to create the grid on the larger paper and show them how to transfer the picture. I use guided practice throughout the project and check for grid accuracy. I write the instructions on the front board to ensure the instructions are always there when needed. I have students write a reflection at the end of the project telling about their thoughts on the project and I have them grade their own work giving an explanation for that grade.

Materials:
Candy bar wrapper copies
Pencil
Ruler
Poster paper roll
Tempera paint
Paint brush
Water
Paper towels

Instructions:
1. Draw a grid on the candy bar copy by making an "X" going from top left corner to the bottom right corner and so on. 
2. Then measure the width and the height and divide both in half. Use those measures to make a centered "t" in the middle of the picture over the "X" that is already there.
3. Make a line halfway between the edge of the picture and the vertical line of the "t" on both sides.
4. Do the same with the horizontal line.
5. Multiply the width and the height both by 3.
6. Using those numbers draw a larger box on the poster paper (after a piece has been cut off the roll).
7. Insert the same grid on the larger box.
8. Transfer one section at a time to the large paper, meaning, do not try to draw one whole letter at a time, only draw in each section what is in the corresponding section on the small copy.
9. Paint the picture to correspond with the original.

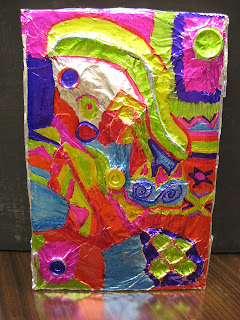
Thursday, January 3, 2013

01/02/13-01/08/13 - Relief Sculpture

Relief Sculpture


Lesson Objective: SWBAT understand the relief process of building up or carving out to form a three dimensional image. Students will be able to use design concepts to create an original relief sculpture.

Essential Skill to be Mastered: To understand how to create a relief sculpture.

I Can Statement: I can use the relief process of building up on a flat surface to create a relief sculpture.

Teaching Strategy: To begin this project I lay out on an empty table about 10 different examples of this project. I ask the students to gather around them and examine to come up with common factors about all of them. When they realize that all of the  examples have different layers built up on each other I then start talking about the relief process of creating sculpture. I then show them the material they are to use and we discuss the different types of designs and how they can use any design they want to. They are then given a blank sheet of paper to draw two colored sketches of what they might want their sculpture to look like. The directions are written on the board and I show them these directions so they always know what is expected of them. I use guided practice during all stages of the project to ensure they are following the guidelines and give help when needed to build the sculpture.

Materials:
6x9 mat board
mat board scraps
Pencil
9x12 drawing paper
Scissors
Glue
Aluminum foil
Sharpie markers

Instructions:
1. Fold drawing paper in half and on each half draw a design to possibly use.
2. Pick the design you like the best or different parts of each.
3. Draw your design onto the mat board.
4. Using scrap pieces of mat board cut out the different shapes that will be used in your design.
5. Glue shapes onto the mat board making sure that some part of the sculpture has at least two layers.
6. After shapes are all glue use glue on aluminum foil. Make sure to start on one side gluing the mat board and pieces completely so the foil sticks to everything.
7. As you are gluing use something to carefully push the foil into the creases of all pieces. This will help give more shape to the mat pieces once they are covered with foil.
8. After project is covered with foil and the glue has completely dried use colored sharpies (regular markers will wipe right off the foil) to color. 
9. You can press slightly harder with the sharpies to create designs "pushed into" the foil and mat board.

Wednesday, January 2, 2013

01/02/13-01/11/13 - Rotation Design

Rotation Design


Lesson Objective: SWBAT use media tools to measure and create an original piece of artwork using contrasting colors.

Essential Skill to be Mastered: To be able to accurately measure 24 2" boxes and fill will two different repeated designs by rotating the paper before each box is filled.

I Can Statement: I can accurately measure 24 2" boxes and fill with a rotating design using contrasting colors.

Teaching Strategy: Day 1 - I will begin the lesson by asking students things that they have ever measured and how they measure them. I will also discuss with them contrasting colors and how well they go together (light and dark colors). After showing them examples of student work I will model how to correctly measure the squares and draw them and how to rotate the paper when they are making their designs. They will first need to draw two different designs that will be used to fill all of the 24 boxes. Days 2 - I will use guided instruction throughout the project and independent instruction if needed. Directions will be written on the front board.

Materials:
8x12 drawing paper
Pencil
Eraser
Colored pencils
Ruler

Instructions:
1. Measure and draw 24 two inch squares paper.
2. On other side of paper draw two 2 inch boxes and fill with two different designs making sure to use contrasting colors.
3. Draw the first design in the top left corner of paper.
4. Draw the next design in a box directly next to the first design using the second design that was drawn on the back of the paper.
5. Rotate the paper one turn and then draw the previous design in another box.
6. Continue this process until all the boxes are filled.